DIY Air Purifier: My First 3D Printing Project
How I built a custom air purifier using Creality Ender V3 SE 3D printer with OpenSCAD-designed parts, bringing my room's AQI down to 50
DIY Air Purifier: My First 3D Printing Project
Building a custom air purifier with 3D-printed parts using OpenSCAD
Delhi winter hit, and my room's AQI was terrible. I'd been looking at commercial air purifiers online and every one of them was either overpriced for what it does, or cheap and useless. The core idea behind most purifiers is dead simple: push air through a HEPA filter. That's it. A fan and a filter.
So I decided to build one myself. I also happened to have a Creality Ender V3 SE sitting on my desk that I'd been meaning to use for something real. Two birds, one stone.
What I Needed
The plan was straightforward: take a HEPA filter, attach an exhaust fan to it, and blow clean air into my room. The hard part? Making the fan and filter actually fit together without tape, glue, or any hacky solutions. That's where 3D printing came in.
| Component | Cost | Details |
|---|---|---|
| HEPA Filter (H13 grade) | ₹3,500 | Catches 99.95% of particles down to 0.3 microns |
| Exhaust Fan | ₹400 | 220V, mounted with M4 bolts |
| PETG Filament | ~₹100 | Stronger than PLA, handles heat better |
| M4 Screws | ~₹50 | For mounting the fan |
| Total | ~₹4,050 |
Compare that to a ₹15,000+ commercial purifier that does the same thing.
Designing the Adapter in OpenSCAD
I needed an adapter plate that connects the circular HEPA filter to the square exhaust fan. The filter opening is 148mm in diameter. The fan's mounting holes are 175mm apart, center-to-center. Every millimeter matters here because the whole point is a precision press-fit: no tape, no glue, just parts that click together.
I used OpenSCAD for the design. It's a code-based 3D modeler: you write a script, and it renders the part. No dragging vertices around, no eyeballing dimensions. You type the exact number you measured, and that's what you get. For someone who writes code all day, it felt way more natural than traditional CAD.
Here's the core of the design:
$fn = 60;

// MEASUREMENTS
screw_spacing = 175;     // Fan holes 17.5cm apart (center-to-center)
filter_hole = 146;       // Lip outer diameter (fits into 148mm purifier hole)
thickness = 6;
lip_h = 10;
lip_wall = 3;
hole_d = 4.5;            // M4 bolt holes (4.5mm clearance)
plate = 200;

// Single piece adapter
difference() {
    union() {
        // Base plate
        cube([plate, plate, thickness]);
        // Lip around filter
        translate([plate/2, plate/2, thickness])
            difference() {
                cylinder(d=filter_hole, h=lip_h);
                translate([0,0,-1])
                    cylinder(d=filter_hole - lip_wall*2, h=lip_h+2);
            }
    }
    // Filter opening
    translate([plate/2, plate/2, -1])
        cylinder(d=filter_hole - lip_wall*2, h=thickness+2);
    // Screw holes for fan mounting
    for (pos = [
        [plate/2 - screw_spacing/2, plate/2 - screw_spacing/2, -1],
        [plate/2 + screw_spacing/2, plate/2 - screw_spacing/2, -1],
        [plate/2 - screw_spacing/2, plate/2 + screw_spacing/2, -1],
        [plate/2 + screw_spacing/2, plate/2 + screw_spacing/2, -1]
    ]) translate(pos) cylinder(d=hole_d, h=thickness+2);
}
The difference() and union() operations are what make OpenSCAD great for this kind of part. You build shapes by adding and subtracting solids. Need four screw holes at exact positions? A for loop with coordinates. Need a lip that press-fits into the filter housing? A cylinder with another cylinder subtracted from the inside. Parametric design means if I measure wrong, I change one number and re-render.
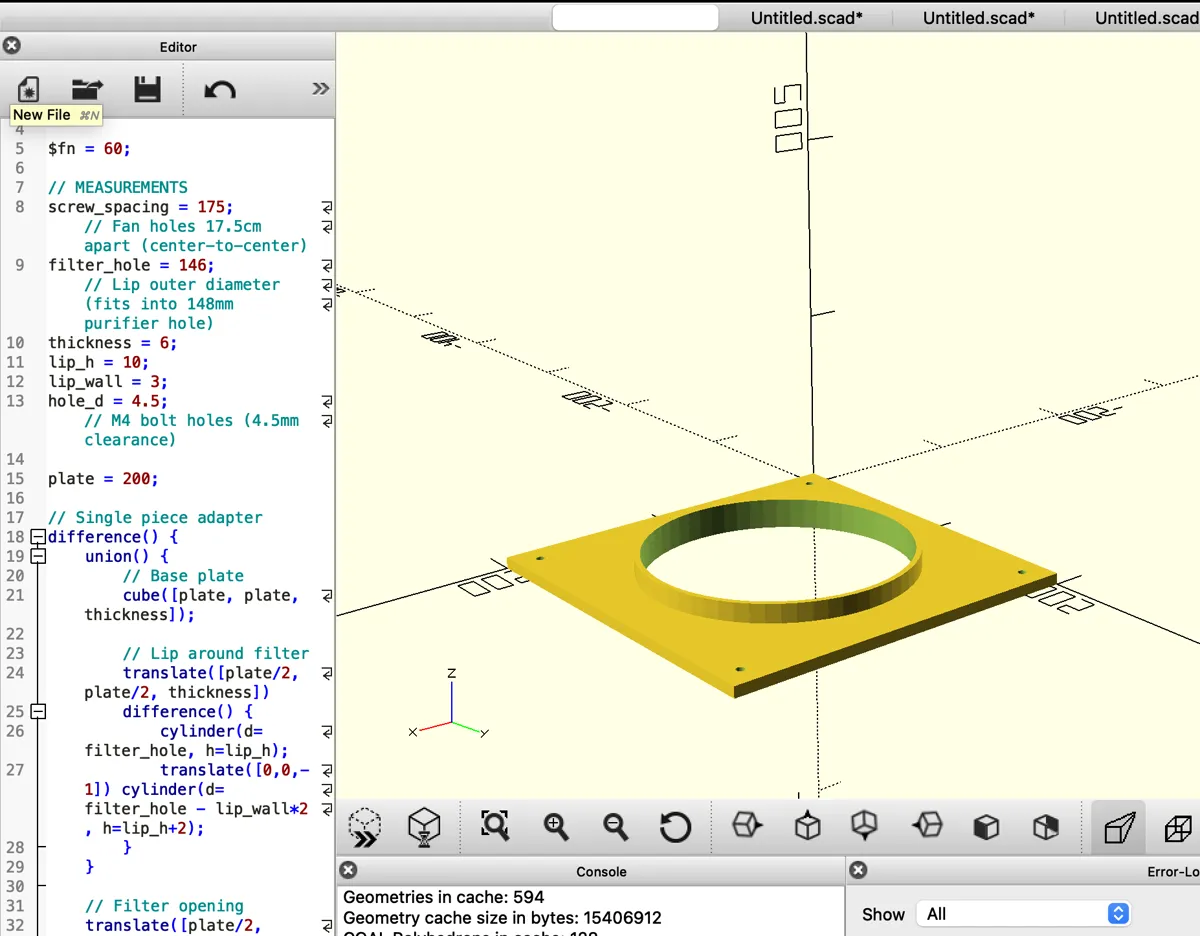
The yellow part in the render is the adapter: a 200mm square plate with a raised lip that fits snugly into the HEPA filter housing, four M4 bolt holes for the exhaust fan, and a center cutout for airflow.
Designing the Honeycomb Body
The adapter was just one piece. I also needed a body to enclose the HEPA filter itself. The filter is a cylinder, 210mm diameter, 293mm tall. I needed a shell around it that lets air flow through freely but still holds everything together.
I went with a honeycomb pattern for the walls. Hexagons tile efficiently, they're structurally strong, and they leave plenty of open area for air intake. The design is two pieces that slide together with an overlap joint at the middle: the bottom half has a stepped wall at the top, and the top half has a skirt that slides over it. Snug fit, no fasteners needed.
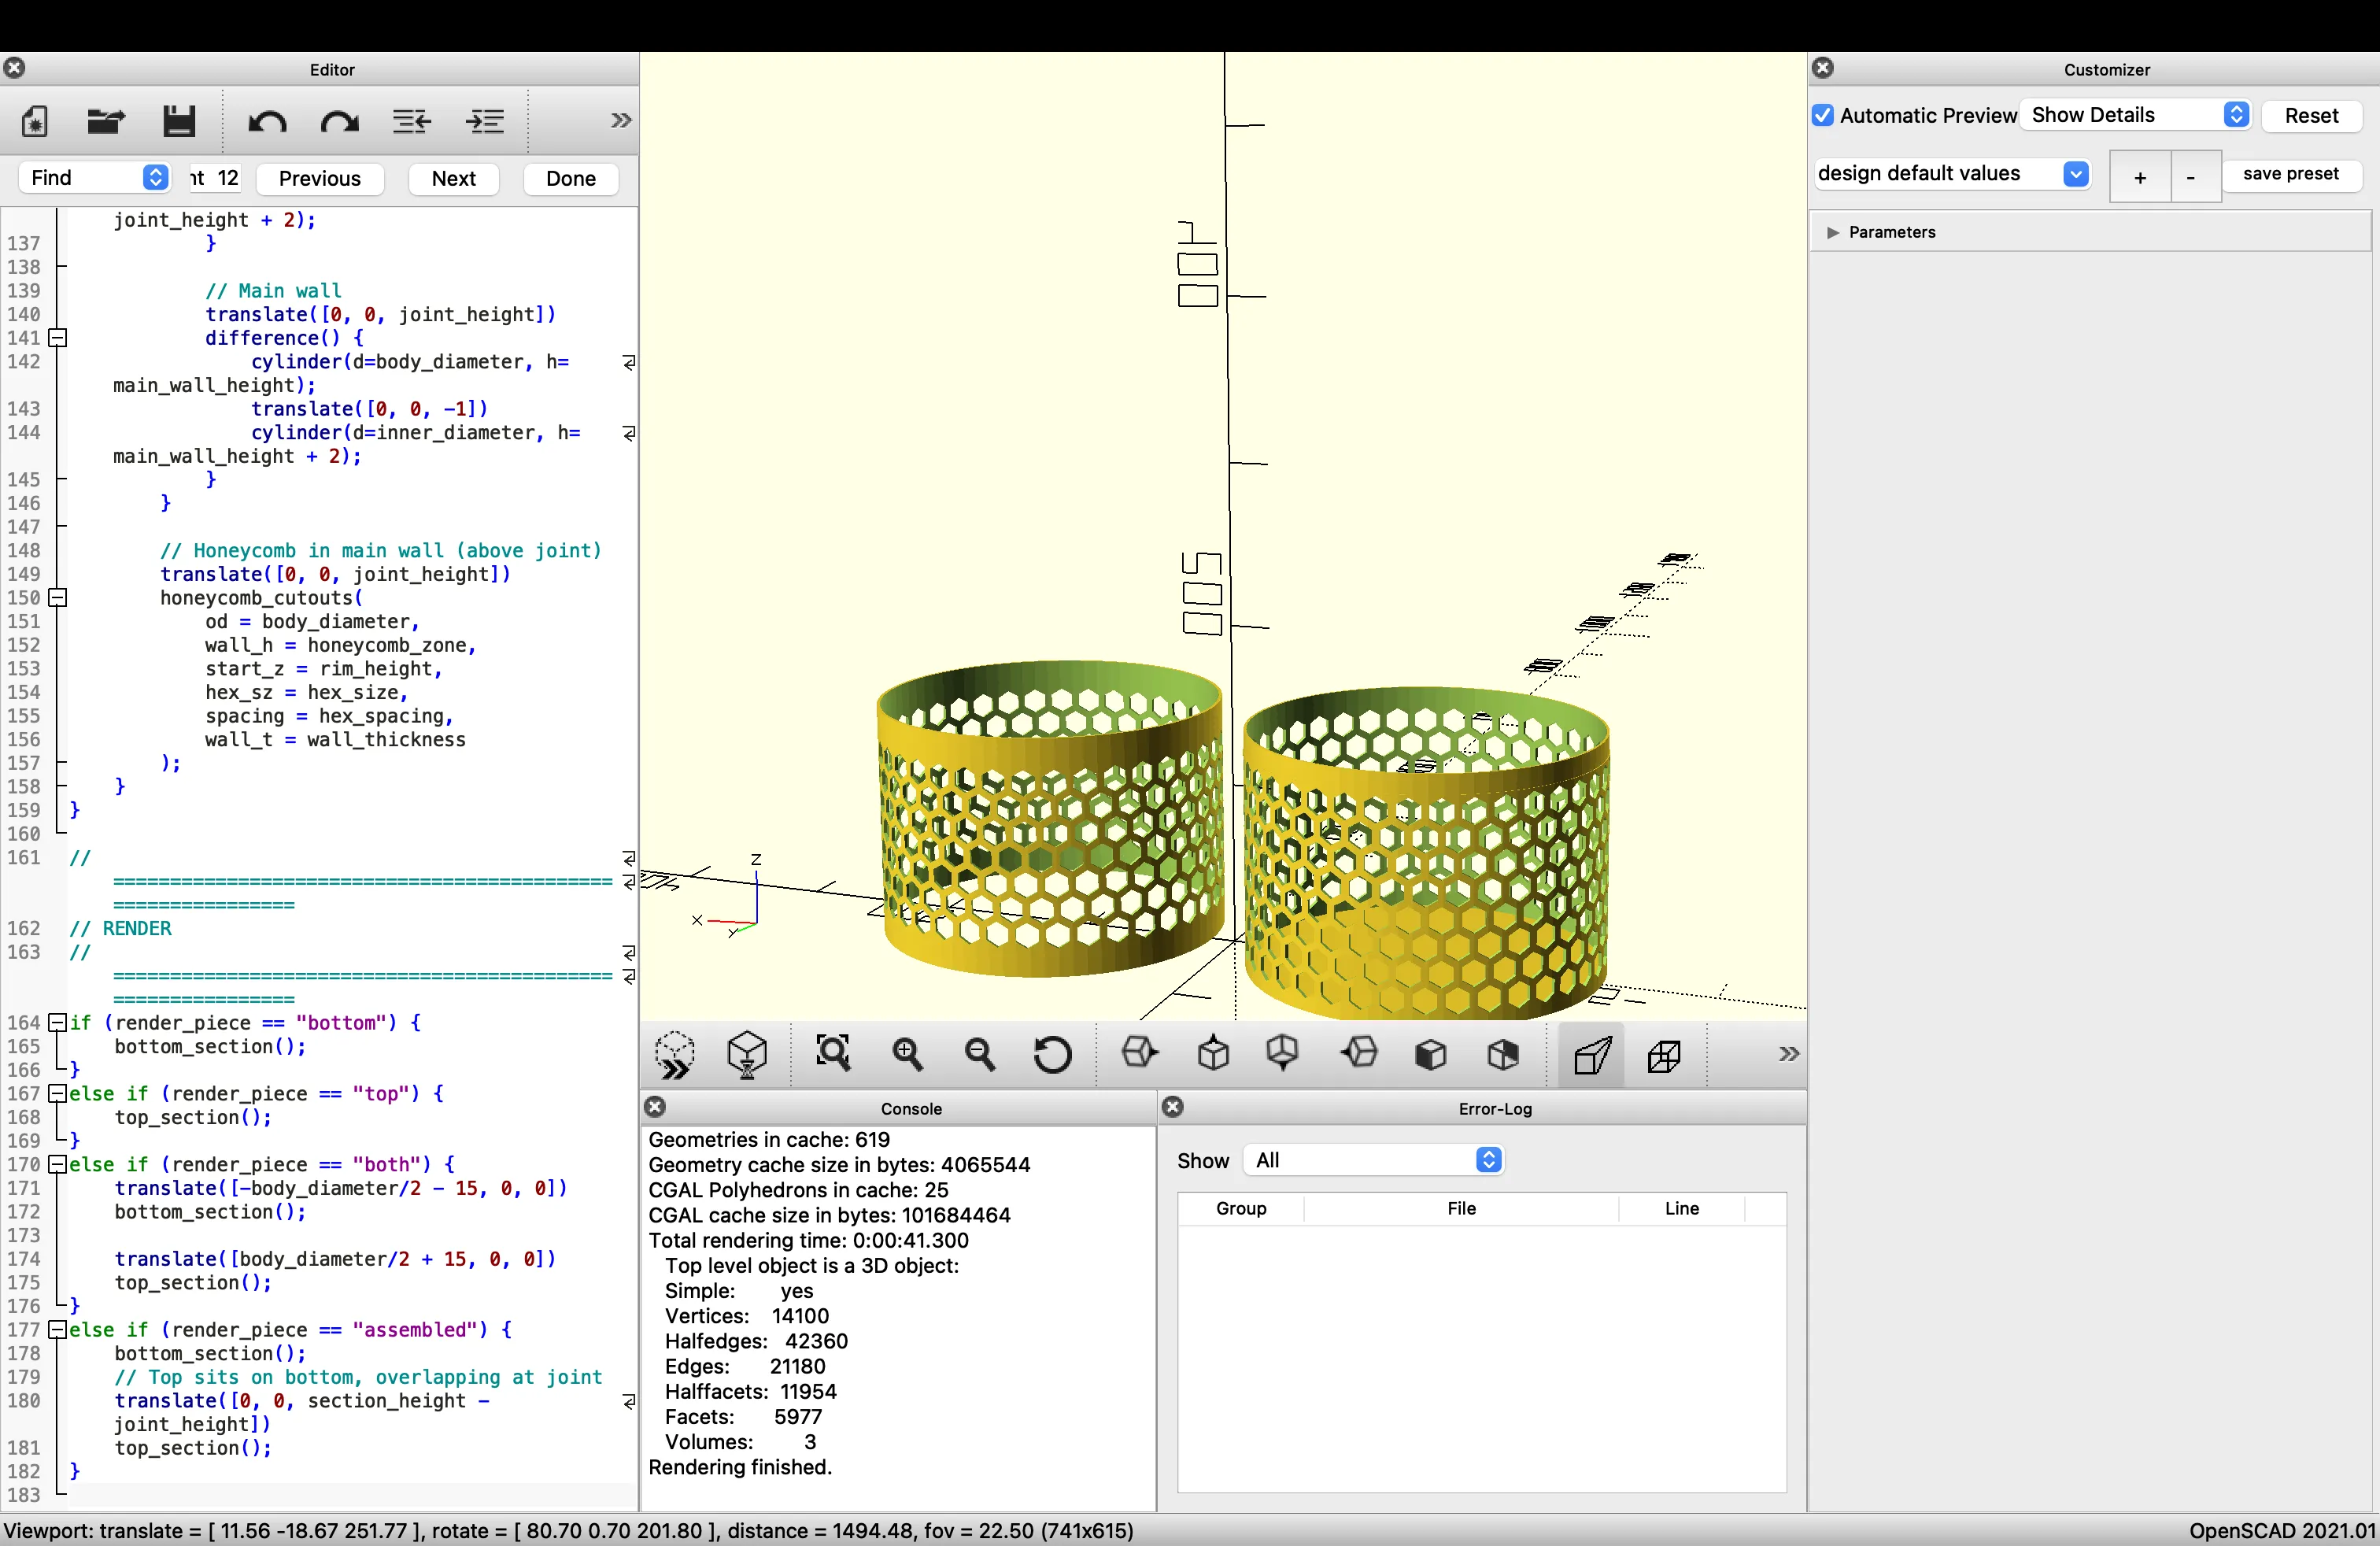
Here's the gist of how the honeycomb cutouts work in OpenSCAD:
module honeycomb_cutouts(od, wall_h, start_z, hex_sz, spacing, wall_t) {
    radius = od / 2;
    circumference = PI * od;

    row_height = spacing * 0.866;
    num_rows = floor(wall_h / row_height);
    num_cols = floor(circumference / spacing);

    for (row = [0 : num_rows - 1]) {
        z_pos = start_z + row_height * 0.5 + row * row_height;
        col_offset = (row % 2) * 0.5;

        for (col = [0 : num_cols - 1]) {
            angle = (col + col_offset) * (360 / num_cols);
            rotate([0, 0, angle])
            translate([radius - wall_t - 1, 0, z_pos])
            rotate([0, 90, 0])
            cylinder(d=hex_sz, h=wall_t + 2, $fn=6);
        }
    }
}
It distributes hexagons around the cylinder by calculating how many fit along the circumference and stacking rows with a half-column offset for that classic honeycomb stagger. The 0.866 factor is the ratio between hex row height and spacing (comes from the geometry of regular hexagons). Each hex is just a 6-sided cylinder punched through the wall using difference().
The overlap joint is simple: the bottom piece's wall steps inward by 1mm at the top, and the top piece's skirt extends down with a 0.25mm clearance gap. Slide one over the other, done. No screws, no glue. The whole body prints in two pieces because 293mm is too tall for most print beds in one shot.
Printing with PETG
I went with PETG over PLA for a few specific reasons. PLA warps above 55°C, and the exhaust fan generates heat during extended use. PETG handles up to 80°C before it starts softening. It's also tougher: PLA is rigid but brittle, while PETG absorbs impact without cracking. For a part that has a fan vibrating against it all day, that matters.
My print settings on the Ender V3 SE:
- Nozzle: 235°C
- Bed: 80°C
- Speed: 40mm/s for walls, 50mm/s for infill
- Part cooling fan: off (PETG doesn't like active cooling)
- Infill: 30%
The print took a few hours. Here's the timelapse:
Assembly
The whole point of the OpenSCAD design was that assembly should be trivial. And it was.
The adapter lip pressed directly into the HEPA filter housing. Snug fit, no wobble, no air leaking around the edges. I bolted the exhaust fan onto the flat side of the adapter using four M4 screws through the pre-designed holes. Then I soldered the power supply wires to the fan motor. Done.
No tape. No glue. No zip ties. Just a 3D-printed part that was designed to fit.
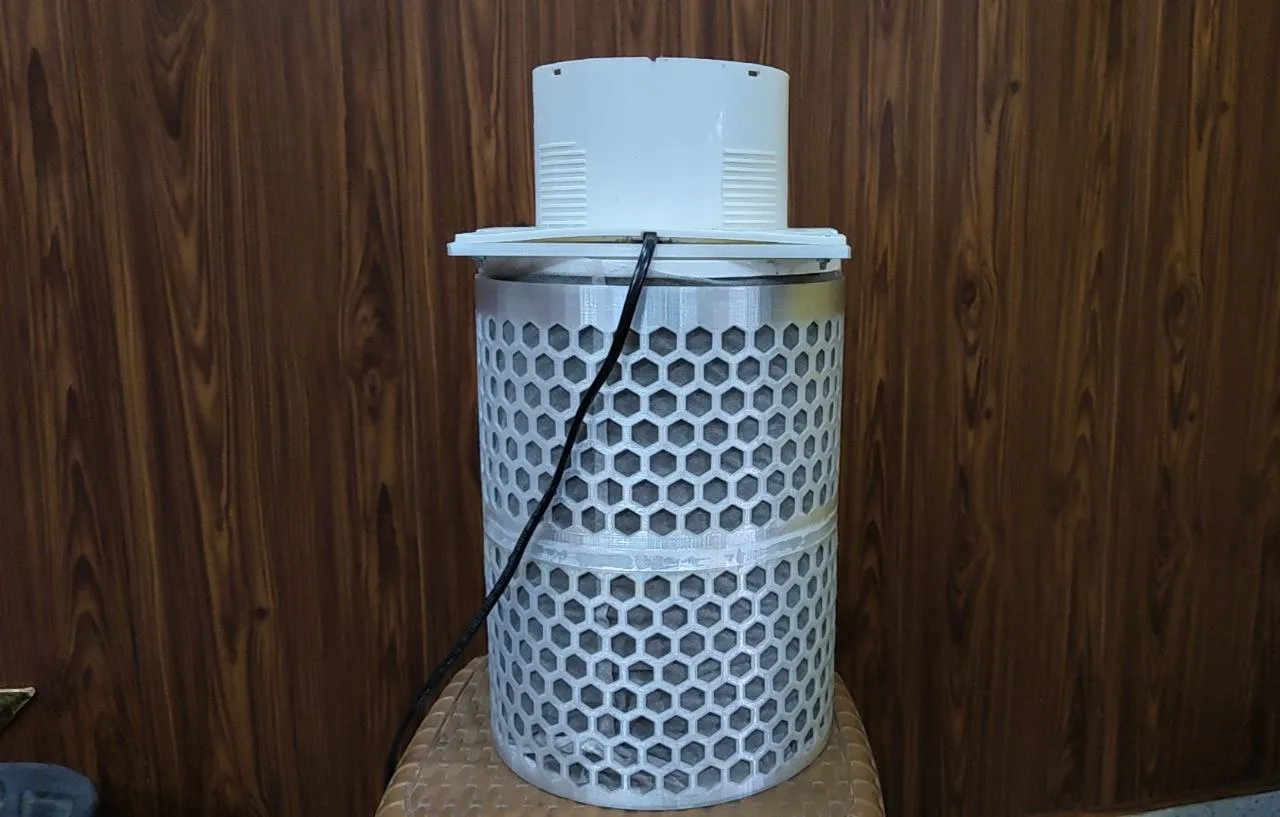
To prove the seal actually works, I held a tissue up to the intake side. It stuck. The suction pulled it flat against the filter surface, which means all the air is going through the HEPA filter and nothing is leaking around the edges.
How It Works
The setup creates positive pressure in my room. The fan pushes air through the HEPA filter and into the room. Because more air is being pumped in than is leaking out through doors and windows, the room maintains slightly higher air pressure than outside. This means outside pollutants can't seep in through gaps: the airflow is always pushing outward.
It's the same principle used in hospital operating rooms and semiconductor cleanrooms, just at a smaller scale.
Results
After running it for a few hours, my room's AQI dropped to around 50. That's "Good" on the AQI scale, down from whatever unhealthy number Delhi winter was throwing at me. The filter catches 99.95% of particles at 0.3 microns (H13 grade), which covers dust, PM2.5, pollen, and most airborne stuff you don't want in your lungs.
What I Learned
This was my first real 3D printing project, and a few things stuck with me.
OpenSCAD is perfect for functional parts. I'm not designing art. I'm designing something that needs to be exactly 146mm in one dimension and have holes exactly 175mm apart. Code-based modeling handles that better than clicking and dragging in a GUI. Measure with calipers, type the numbers, print.
Material choice is not an afterthought. If I'd printed this in PLA, it would've warped within a week from the fan's heat. PETG costs about the same and handles the thermal and mechanical stress.
Simple designs win. The adapter is one piece, no moving parts, four bolts. I didn't overthink it. First design, first print, it worked.
The Final Product
Here's the purifier running in my room:
Total cost: ~₹4,000 | Build time: One afternoon | First 3D printing project: done.
Comments (0)
Loading comments...